Thursday, November 10, 2011

Simple DIY USB based hard drive rack with "unlimited" expansion possibilities

This is a post about a simple DIY USB harddisk rack project I did a couple of years ago. Though a little outdated, the principles are still valid at the time I write this.

I have a small server at home use which ran out of SATA slots when I needed to install more hard drives to satisfy my MythTV recording storage need. MythTV was which was filling up all available space by the hour. There were a couple of available solutions to the problem:
  1. install another I/O card,
  2. buy a NAS,
  3. setup a new server, or
  4. buy external USB HD containers.
I wanted a solution which allowed for simple "unlimited" future expansion without too much hassle. None of the above solutions really fulfilled my requirements. The server case was already filled with hard drives so an added I/O card would not work. Setting up a new server seemed to bothersome and expensive since I already had a server, and having another server to maintain wasn't really something I was looking forward to. Buying external USB containers wasn't a good solution either since that meant that the snake pit of power outlets and cables would grow unmaintainable. An NAS was the most attractive alternative, but shelling out more than $500-600 for a 5 slot NAS wasn't economically attractive either. So I decided to come up with a different solution to the storage space problem by combining the server alternative with the USB container alternative. This solution allows for basically unlimited storage expansion with just using one or two power outlets and only one USB port on the server:


The principle is to have a single case which only contains a PSU, and install all hard drives on a USB HUB inside the case using USB-to-SATA adapters. Here is what I bought for my installation:

  • $20 Computer case with PSU
  • $5 Four port USB powered USB HUB
  • $2 USB extension cable
  • $20x2 USB to SATA adapter cable
  • $67 Total

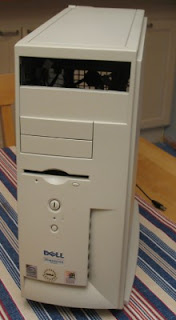
Below is the case I had lying around which I used until its PSU broke down and I bought the $20 replacement case. The case below is from the late stone age and had only two 3.5" slots, but it was quite sufficient to use for proof-of-concept.


Below is the USB to SATA converter I used in the project. Only the cables on the right were needed, the rest is just so much computer trash.


Here is a shot of the concept behind the system: the HD is connected to the converter which is connected to the USB HUB, which then is connected to the server via a USB extension cord (not shown).


And here is the complete system with two attached HDs. If you look closely you'll see that the HD mounted in the rack is an old IDE drive. The drives get their power from the PSU. Note: you will need to short circuit two of the connectors on the motherboard connector on newer PSUs to make the PSU start at all. Here is an article on it, and here is a video. You take responsibility of not frying your PSU in the process - make sure to verify that the PSU relly need short circuiting.


A new USB to SATA converter is needed for each new hard drive which is added to the system, and later on new USB HUBs are added to support more HDs. All the space where the motherboard normally is located is available for more HDs.

My experience is that this configuration was sufficient for use as a bulk storage system, and I had no issues with recording multiple TV programs while copying large files from the server over the network. I had three HDs in the storage at its peak, after which the IDE drive failed and one of the converters broke down. USB 2.0 is running on 480 Mbit frequency, which may possibly cause congestion if many of the drives are accessed in parallel (I lack deep knowledge of the USB transport inner workings).

Still, if you are looking for an idea for a bulk storage solution without adding servers or expensive NAS racks, perhaps this is something for you.

Thursday, October 6, 2011

Almost unattended CPAN module installation

Summary

This article explains how to reduce questions during the installation of CPAN modules. Simply change the cpan configuration:
sudo cpan
o conf prerequisites_policy follow
o conf build_requires_install_policy yes
o conf commit

Discussion

Unattended installation of CPAN modules is unfortunately a utopia. The reason is simple; the interface for module installation is unrestricted, and any module can ask questions of the user during the installation process, eg "Skip network tests [y]?". This is a bother, especially when installing some modules which seem to indirectly depend on half of the modules on CPAN. These questions would be acceptable if all could have been clumped together at the start of the process, since I am not responsible for manually updating any significant number of hosts. Module dependencies are resolved in each individual package's installation process instead of being handled on a higher level, which means that it is not possible to resolve all questions at the start of the process.

Though perl's module installation process is crude, it is also in good company. Even the more modern package manager used by Debian, dpkg, also suffers from the same illness. Configuration questions pops up now and then during installation and upgrade. Ubuntu has made a fine job of minimizing most of these, but changing any system configuration file will always result in required attendance during upgrade: "Do you want to: I) install package maintainer's version..." etc. That's why I prefer configuration directory supported configuration, ie putting local changes in local files which are separate from the file in the package, eg Apache, sudo.

Back to the topic at hand. I have found three types of questions which can appear during perl module installation:
  1. package dependencies,
  2. temporary modules required for build or test, and
  3. package specific configuration or test.
There may be more, but these are the ones I have run into. Items 1 and 2 are handled by CPAN, and item 3 by the individual package, which means that only items of type 1 and 2 can be handled completely unattended. My preference is to always follow dependencies and always install modules required for build or test, thinking "if one package wants it, chances are good other wants it too".

As described in the summary, change the following cpan configuration items:
sudo cpan
o conf prerequisites_policy follow
o conf build_requires_install_policy yes
o conf commit
And there you have it, no more questions about dependencies.

Finally, one may think that solving the last item would be as simple as to tell cpan to always answer "yes" to whatever question the package is throwing in your general direction, perhaps like this:
yes | sudo cpan Some::Module
Unfortunately the world isn't black and white so the above would fail for DBIx::Migration::Directories, which asks for a directory where schemas are stored.

Conclusion

Setting the above configuration options have saved me a lot of time during installation, since I can mostly leave the terminal unattended. I recently made a scratch installation of a Xubuntu 11.04 system, and upgraded to the latest version of CPAN ("sudo cpan CPAN"). It caused a module explosion but I still got no more than a handful of questions during the entire process, and could focus on more rewarding things, like beer'n pretzels. Now you can too.